Monday, May 22, 2017

How to Get all Blu-ray into NAS drive for Streaming

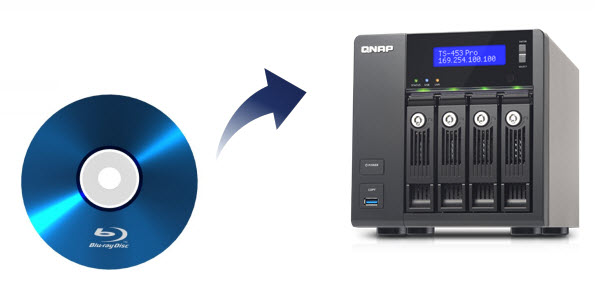
QNAP TS-453 Pro, featuring the easy-to-use QTS operating system, is a powerful, reliable, secure and scalable NAS solution designed for mission-critical business applications and to meet fast growing data storage needs. If you have a QNAP NAS (TS-453 Pro) device, you probably would like to copy your beloved Blu-ray collection to NAS(network attached storage device) to allow you to stream and play via multiple computers, TV, iPad, iPhone, Android phone, media streamers (Xbox, PS4, Roku, WD TV, Apple TV) or media players. Read the following article to learn the easy sollution for backing up Blu-ray movies to QNAP NAS (TS-453 Pro) drive. 


Almost all Blu-ray movies are encrypted with copy protection. Decryption keys are stored in the normally inaccessible lead-in area of the disc. You’ll usually get an error if you try to copy the contents of an encrypted Blu-ray to NAS, even the copied m2ts files. Therefore, to store dozens of Blu-ray movies to QNAP NAS (TS-453 Pro) device, you need to get the content off the Blu-ray disc as a protection-free and easily readable element for NAS. 

In this case, powerful third-party software for ripping Blu-ray to NAS is what you need. There are many, many Blu-ray ripping tools on the market. I've tired a pile of them. Dimo Video Converter Ultimate for Mac is the best one I've tried yet. It is capable of ripping Blu-ray to MP4, AVI, MKV for QNAP NAS (TS-453 Pro) streaming with no quality loss; it also enables you to copy Blu-ray main movies for backup onto NAS in lossless mkv format. Best of all, it allows you to backup Blu-ray to ISO for storage and playback later. If you are running on Windows PC, turn to Dimo Video Converter Ultimate. If you haven't got the software, download it now and let's start the conversion.

Free Download Dimo Video Converter Ultimate for Mac/Win:


Other Download: 

How to rip and copy Blu-rays to QNAP NAS (TS-453 Pro)

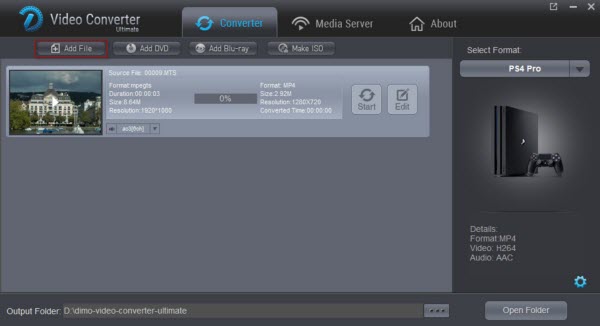
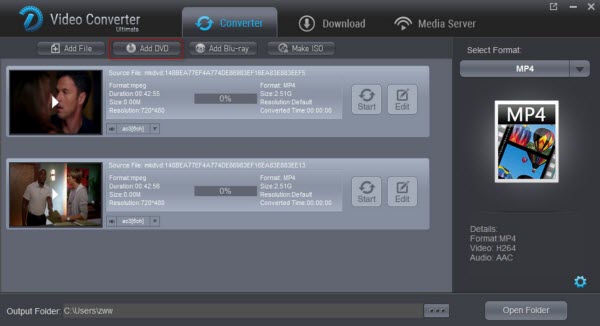
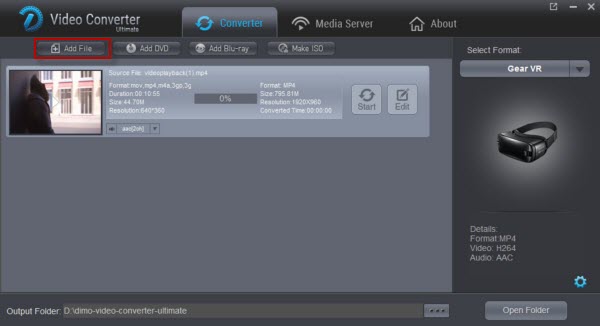
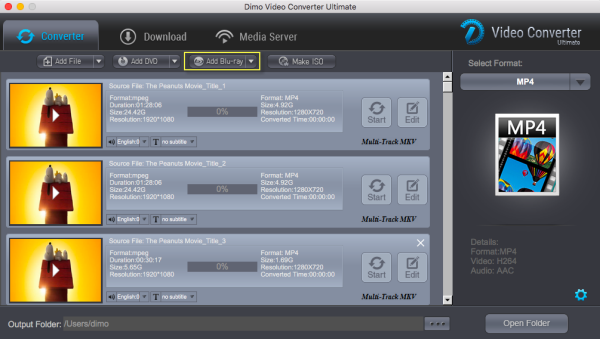
STEP 1. Add Blu-ray files

Launch the Blu-ray ripping program for NAS devices. Then click "Add Blu-ray" to import the Blu-ray files you want to convert. To select the audio track you like, simply click the audio track option and select the one you prefer. Not only Blu-ray, but also DVD and other SD/HD/4K videos are all supported including H.265.  

Tip: If you want to transfer Blu-ray to QNAP NAS (TS-453 Pro) retaining Blu-ray quality and you have a lot of spare space, you can choose "Make ISO" to copy Blu-ray disc to an iso. That makes one file for the Blu-ray. Make sure your media streamer can read .iso files first. 


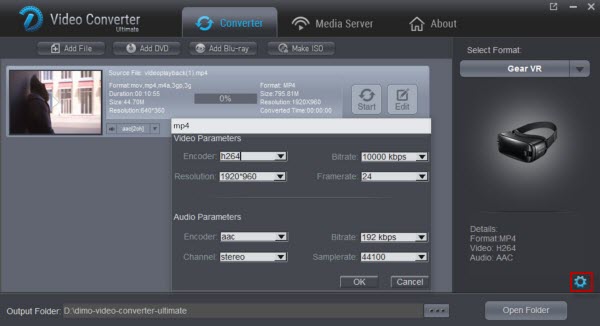
STEP 2. Choose an output format

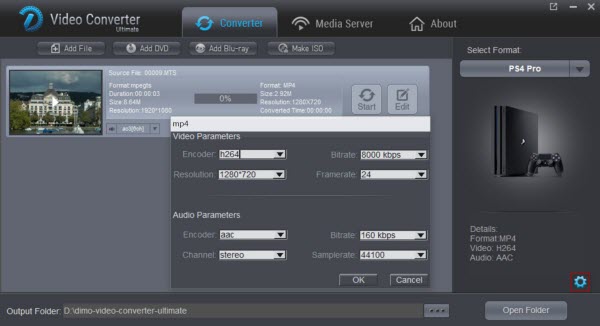
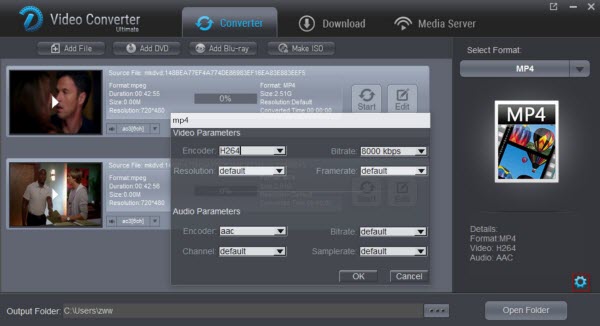
Click "Select Format" bar and choose your desired format.

a. If you want to store hundreds of Blu-ray's on NAS, then rip the Blu-ray to .avi, .mp4, .mkv, etc compressed format. And what I've learned is that MP4 would be one best target format for it is fully compatible with nearly all media devices including iPad, iPhone, Xbox, Apple TV, etc. 

Then click Settings bar, you can adjust the level of compression to suit the quality you want. Remember the file size and video quality is based more on bitrate than resolution which means bitrate higher results in big file size, and lower visible quality loss.


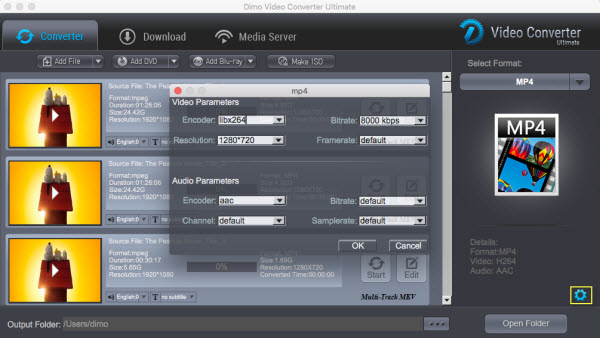
b. Besides the wide range of supported formats, you can also backup Blu-ray to lossless mkv to keep 5.1/7.1 surround sound and subtitles. Or convert Blu-ray to multi-track MP4 for Blu-ray playback with different languages. You can alsocustomize settings and change the encoder, resolution, frame rate, bitrate for video and encoder, channel, sample rate and bitrate for audio.  

c. If you only need to copy the main movie of Blu-ray as M2TS streams without extras, you can directly copy Blu-ray movies to .m2ts streams for free playback on common media players with high quality with another Blu-ray copy - BDmate for Mac/Win.

STEP 3. Start copying Blu-ray to QNAP TS-453 Pro NAS drive

Press the "Start" button to start ripping Blu-ray movies to QNAP NAS (TS-453 Pro). When the conversion finishes, click Open button to find the output files. Make sure the wireless network connection is accessible among the NAS and your device. Then, you can stream and watch the high quality Blu-ray movies from NAS on multiple computers, Tablet, Phone, smart TV, HD Media Players, Game Console, or other devices at ease.

Note: The TS-453 Pro will also delivers superior real-time Full HD video transcoding to convert videos to formats that can be smoothly played on PCs, mobile devices and Smart TVs. With the benefit of offline transcoding, if you can only connect to an Internet connection with limited/restricted bandwidth, you can still enjoy smooth videos by selecting a pre-rendered lower resolution to play the videos via File Station, Video Station, or the Qfile mobile app without affecting the TS-453 Pro's system performance running other applications.

Free Download or Purchase Dimo Video Converter Ultimate for Mac/Win:


Need the lifetime version to work on 2-4 Macs so that your friends and family can instantly broaden their entertainment options? Please refer to the family license here


Kindly Note:

The price of Dimo Video Converter Ultimate for Mac is divided into 1 Year Subscription, Lifetime/Family/Business License: $43.95/Year; $45.95/lifetime license; $95.95/family license(2-4 Macs); $189.95/business pack(5-8 Macs). Get your needed one at purchase page.

Contact us or leave a message at Facebook if you have any issues.

Related Articles:

Friday, May 12, 2017

Convert MP4 for streaming to PS4 Pro

Sony's PlayStation 4 Pro Console, better known as PS4 Pro, is not merely a game console running games at higher resolution, it is capable of outputting 4K graphics, HDR support, smoother and more stable framerates, and 4K video streaming. As a media streamer or player, PS4 Pro can play video and music files from a PC or USB stick. Can PS4 Pro play MP4 videos? Does PS4 Pro play MP4?


Although it's officially claimed that PS4 Pro supports the MP4 files, we might occasionally have troubles in playing an MP4 file on the PS4 Pro. Why Won't PS4 Pro Playback MP4 Video? That's because it only supports an MP4 file with the video codec of MPEG-4 AVC H.264 and MPEG-4 in the following technical specification: 

Video in MPEG-4 SP (Simple Profile) and audio in AAC LC (Low Complexity) format
Video in H.264/AVC HP (High Profile) and audio in AAC LC (Low Complexity) format
MPEG-2 TS format with video in H.264/AVC and audio in AAC LC (Low Complexity) format

While, MP4 is a container video format which may contain various video or audio codec. If the MP4 video is not encoded with PS4 Pro compatible codec (for example MP4 with 5.1 AAC audio), we will fail to stream MP4 to PS4 Pro or cannot play MP4 on PS4 Pro even if we have successfully transferred MP4 to PS4 Pro.

How to Play MP4 on PS4 Pro Successfully?

To play all kinds of MP4 videos on PS4 Pro you first have to convert the MP4 file to the file formats PlayStation supports which are MP4, AVI or MPEG-2. If you are looking to convert MP4 files to PlayStation 4 Pro on your Windows operating system then Dimo Video Converter Ultimate can help you do that. It can help you convert MP4 into the supported formats of PS4 Pro. Other format videos like MKV, VOB, FLV, MOV, F4V, MXF, AVCHD, MTS, ASF, etc. can also be converted with Dimo.

Get the Best MP4 to PS4 Pro Video Converter:

* Fast Conversion with best quality: Flawless conversion of media files with best quality standards within seconds.

*  Library of Presets: Flexible & category-wise profiles allows you to switch media files from one file format into another with more than 150 presets incluing PS4 Pro, PS4, PS3, Xbox 360, Xbox One, Xbox One S.

* Offers Core Editing TOOLS: It is equipped with advanced video editing function like extracting audio, cropping video, splitting video, trimming, adjust effects, add watermarks/effects, change bit rate or frame rate etc.

*  Export local movies via wifi: One-click to share Videos from computer to iPhone, iPad, Android, TV, etc wirelessly.

* Make ISO files: Turn video folder or Blu-ray to ISO files for backup or playing freely

*  Compatible Windows 10/8.1/8/7/XP/Vista, as well as macOS 10.12 Sierra, 10.11 El Capitan, 10.10 Yosemite, 10.9 Mavericks, 10.8 Mountain Lion and 10.7 Lion, etc.

For Mac users, Dimo Video Converter Ultimate Mac is also a helpful app to encode MP4 videos to PS4 Pro on Mac for further usage. Just get the right version according to your computer's OS and follow the step-by-step guide below to convert MP4 files to PS4 Pro smoothly.

Free Download Dimo Video Converter Ultimate (Win/Mac):


Other Download: 

How to convert and stream MP4 to PS4 Pro

Step 1. Load MP4 files

First, run this smart MP4 to PS4 Pro video converter and then import your local MP4 files by either clicking "Add file" button in the top-left corner of the interface or drag-and-drop the MP4 files you want from your local directory. It's illustrated in the screenshot below.


Step 2. Select output format

Now click the "Select Format" icon to reveal output panel, then move mouse cursor to "Device > Game" category to Select PS4 Pro as the output format.

Tip: By clicking the Settings icon, you can adjust video and audio parameters like codec, bit rate, frame rate, sample rate, etc., in that way, you can take charge of the size and quality of the output files. In principle, the larger input values, the better output quality, but the corresponding larger file size.


Step 3. Start converting MP4 to PS4 Pro

At this point, you can change the output filename or output path if you wish. If you feel satisfied with your options, Just hit the "Start" button to activate MP4 file to PS4 Pro conversion. When all conversions completed, you'll get a pop-up notice. Just click "Open", you can fast find where your converted files are saved. Now you can stream the incompatible MP4 files on PS4 Pro via streaming or the help of a USB storage and enjoy them without any hassles.

P.S.

Though the truth that the PS4 Pro will not be able to play 4K Blu-ray movies which may disappoint you, you can still take advantage of Video Converter Ultimate to convert videos and movies you like to play on PS4 Pro.

Free Download or Purchase Dimo Video Converter Ultimate:


Need the lifetime version to work on 2-4 PCs so that your friends and family can instantly broaden their entertainment options? Please refer to the family license here


Kindly Note:

The price of Dimo Video Converter Ultimate for Windows is divided into 1 Year Subscription, Lifetime/Family/Business License: $43.95/Year; $45.95/lifetime license; $95.95/family license(2-4 PCs); $189.95/business pack(5-8 PCs). Get your needed one at purchase page.

Related Software:

BDmate (Win/Mac)

Lossless backup Blu-ray to MKV with all audio and subtitle tracks; Rip Blu-ray to multi-track MP4; ConvertBlu-ray to almost all popular video/audio formats and devices; Copy Blu-ray to ISO/M2TS; Share digitized Blu-ray wirelessly.

DVDmate (Win/Mac)

A professional DVD ripping and editing tool with strong ability to remove DVD protection, transcode DVD to any video and audio format, and edit DVD to create personal movie.

Videomate (Win/Mac)

An all-around video converter software program that enables you to convert various video and audio files to formats that are supported by most multimedia devices.

8K Player (Win/Mac)

A mixture of free HD/4K video player, music player, Blu-ray/DVD player, video recorder and gif maker. 

Related Articles:

Monday, May 8, 2017

Get DVD movies into Plex for playback with Ease


As a media server application, Plex enables us to share music, movies on TV, PS3, PS4, Xbox 360, Android, iOS, and other DLNA-certified devices locally via home network connection, or remotely, as long as you have a Internet connection. To make the whold process of putting DVD into Plex for streaming and sharing to create a wireless home entertainment setup, you'll need to convert DVD to Plex compatible file formats first. For this purpose, this article will show you the way to rip and copy DVD discs for streaming over Plex Media Server for watching on TV, Android, iOS, etc. even without downloading a DVD player.


To rip DVD to Plex media server, many people is used to using HandBrake. However, the tendency becomes changed. On one side, HandBrake does not support copy protected and especially the latest DVDs natively; on the other side, it has more and more issues now such as not encoding fully. To copy all kinds of DVDs to Plex server more smoothly and easily, you are suggested to turn to a professional DVD to Plex ripper for MacBook, iMac, Mac Pro on Mac OS Sierra, OS X El Capitan, Yosemite, etc. - Dimo Video Converter Ultimate for Mac.

With it, you can easily convert the commercial DVD movies to Plex compatible video files with high quality and fast speed. It aims to solve this problem by giving us the ability to store our purchased physical DVD, Blu-ray discs or video files to local computer, hard drive then stream over a home network for Plex Media Server and Samsung Galaxy, Surface, iPad, iPhone, iPod Touch, etc. playback. It's professional in ripping and converting Blu-ray/DVD discs, Blu-ray/DVD ISO image, Blu-ray/DVD copies, SD/HD/4K videos and more.

The equivalent Windows version is Dimo Video Converter Ultimate which can rip and convert DVD movies to Plex Media Sever on Windows 10, Windows 7/8.1/XP/Vista. Just get the right version according to your computer's operating system and follow the steps below to copy DVD movies to Plex Media Sever for streaming with ease.

Disclaimer: Digiarty Software does not advocate ripping copy-protected DVDs for any commercial purpose and suggests referring to the DVD copyright laws in your countries before doing so.

Free Download Dimo Video Converter Ultimate (Win/Mac):


Other Download: 

How to Backup and Rip DVD to Plex Media Sever

1. Add DVD movies

Install and launch DVD Ripper for Plex program, and then click "Add DVD" icon to import your source movies to this program. Set your wanted audio track from the drop-down box of "Audio" tab.


2. Select an output format

Click the "Select Format" option, and choose MP4, SD/HD/4K MKV, etc. from "Format > Video", "Format > HD Video", "Format > 4K Video" as output format. 

Situation 1. If you want to preserve everything on a DVD, the best output format should be MPEG. 

MPEG/MPEG2 file converted from a DVD also contains the full information of the original, but the output file will be much smaller than others. One more thing.mpg file is generally friendly with TVs.

Situation 2. If you are not overly concerned about file size, and would prefer the best-quality MKV container for output.

Choose "Lossless MKV" from "Format > Multi-track". It is the standard of HD video in DVD or 1080p quality, and would preserve any multichannel audio (i.e. 5.1 surround sound). The file size may range from 4GB to 7GB. It would be widely accepted by kinds of media servers like Plex, NAS, Xbox, etc.. The audio codec ned to go to AAC, AC3 and DTS.

Situation 3. If you want to seek a good balance between quality and size, and MP4 (MPEG-4 Part 14) would always be the answer.

MPEG-4 video is the most universal format that is the best choice for playing or streaming movies onto Apple, Android, Microsoft and Sony devices like HDTVs, iPhone, Apple TV, Mac, Samsung smartphone, Xbox, PS3 and PSP. Barely any player and gadget does not support MP4. Besides, it has a better video compression, so it can deliver a good quality outcome in small file size comparatively.  >> See How to Rip DVD to MP4

Tip: If you like, you can click "Settings" to change the video encoder, resolution, frame rate, etc. as you wish. Keep in mind the file size and video quality is based more on bitrate than resolution which means bitrate higher results in big file size, and lower visible quality loss, and vice versa.


3. Start ripping DVD for Plex Media Sever

Click the "Start" button under the preview window, and the DVD ripper will start the conversion from DVD movies to MKV or MP4 for Plex Media Sever. After conversion, you can stream DVD movies through Plex Media Server to HDTV or iPad, iPhone, Android, or other DLNA-compliant devices.

How to Stream or Store DVD Movies with Plex or Roku Media Server?

If you are to use/are using Plex:

Step 1. To transfer DVD/DVD movies to Plex, first download, install and launch Plex app.
Step 2. Create a Plex account.
Step 3. Add library by clicking "Add Section" button and selecting "Movies".


Step 4. Select the DVD rips you want to add and click the Add Folder button.
Step 5. Tune into Plex and by use of DLNA-friendly device (like DLNA-receptive set-top box, gaming console, a Chomecast) to stream the movies to different devices. Thus, you can create a digital library for use around my home by my family.

Free Download or Purchase Dimo Video Converter Ultimate:


Need the lifetime version to work on 2-4 PCs so that your friends and family can instantly broaden their entertainment options? Please refer to the family license here


Kindly Note:

The price of Dimo Video Converter Ultimate for Windows is divided into 1 Year Subscription, Lifetime/Family/Business License: $43.95/Year; $45.95/lifetime license; $95.95/family license(2-4 PCs); $189.95/business pack(5-8 PCs). Get your needed one at purchase page.

Related Software:

BDmate (Win/Mac)

Lossless backup Blu-ray to MKV with all audio and subtitle tracks; Rip Blu-ray to multi-track MP4; ConvertBlu-ray to almost all popular video/audio formats and devices; Copy Blu-ray to ISO/M2TS; Share digitized Blu-ray wirelessly.

DVDmate (Win/Mac)

A professional DVD ripping and editing tool with strong ability to remove DVD protection, transcode DVD to any video and audio format, and edit DVD to create personal movie.

Videomate (Win/Mac)

An all-around video converter software program that enables you to convert various video and audio files to formats that are supported by most multimedia devices.

8K Player (Win/Mac)

A mixture of free HD/4K video player, music player, Blu-ray/DVD player, video recorder and gif maker. 

Contact us or leave a message at Facebook if you have any issues.

Related Articles:

Wednesday, May 3, 2017

Fast Solve Gear VR MKV Playback Issue

Samsung Gear VR is a mobile virtual reality device, which acts as the headset's display and processor. One advantage of Samsung Gear VR is that Samsung and Oculus has made it easy to import and watch your own local movies in virtual cinema mode. Though Gear VR claims to support MKV formats, somtimes we still encounter Gear VR MKV playback problems. Some VR movies in MKV play nicely while others won't play on your Gear VR or playback with no sound. So what's the matter? Check out the reason and solution for "No sound in Gear VR" here.


Why Some MKV Won't Work with Gear VR on Galaxy S7/S7 Edge/S6/Note7/5/4

Samsung Gear VR by default supports most common file formats including MKV, MP4, AVI, and FLV. When it comes to playing 3D videos, Gear VR requires either side-by-side or top-bottom (top down). However, a MKV is just a container format, holding video, audio, image or subtitle files in it. The video and audio files in different MKV files can be encoded with different codecs. For example, an MKV file with DTS audio can't be rendered on Gear VR. Fast research in the Internet has shown, that the problem was in audio codecs and the list of supported by Oculus audio formats. As it turned out AC3 and DTS audio are not supported by Oculus Video Players yet. If your MKV media contains AC3 or DTS audio, it will not work on Oculus player in Oculus Cinema. 

Three solutions to get MKV to play on Gear VR with proper audio

Soluton 1:  Encode MKV to Gear VR with VidCoder (Free but a little complex)

Basically you won't be able to play MKV file on Gear VR as it is, you will need to encode it to the supported format. Here comes a free solution that I chose for myself after browsing dozens of articles and forums.  

1. You will need to download and install on your computer VidCoder   – free but simple to use and very functional software.

2. Run the app and choose the file you want to encode.


3. Than choose the folder you want the encoded file to be saved and hit Settings button, we will create a preset so next time when you need to encode the movies the further steps would be unneeded.


Pay attention, that in case your movie has several languages, you need to choose and audio track you want to use. Settings screen has 4 tabs, but we will need just 2 of them.


In Picture tab, select Container MP4 and make sure no cropping would be done to the output file. That means that the picture will not be resized and there will no quality loss for the picture.

4. Now move to the Audio Tab

Choose AAC or MP3 as the codec and set Stereo as Mixdown (of course if you have fancy 5.1 earphones you can leave at as default).


5. Now hit Save button and enter the name of the template, so the next time you won't need to enter the settings again.

6. Now go back to the VidCoder home screen and press Encode button.


Now wait till the process is completed and copy the file from your computer to the phone.

That's it! By the way, this program works perfectly fine with 3D movies as well, and won't need to change the Settings to encode your 3D video, and then refer to the steps to play 3D on Gear VR

Soluton 2: Convert MKV to Gear VR with Dimo (Direct and effective)

To fix these problems, the effective and simple way is to change MKV to a fully compatible format with Gear VR. We've rated and ranked the best 3D Video Converter software on the market today. And Dimo Video Converter Ultimate is one of the top one which allows you to enable MKV with AC3 playable in Gear VR by converting MKV to Gear VR friendly MP4 video with with zero quality loss in stunning Top-bottom and Sidey-by-side 3D effect. Besides viewing MKV video on Gear VR, if you also wanna put other media files like MTS, MXF, VOB, 3D YouTube videos as well as DVD, Blu-ray movies to Gear VR for  playback.

It not only offers customized profile preset for VR devices like Gear VR, Oculus Rift and HTC Vive,  it allows you the tweak the video, audio parameters so that you can get a decent file as you want.  For those who are running on Mac OS X(Sierra, El Capitan included), you can get Dimo Video Converter Ultimate for Mac to achieve your goal. Here goes the step by step guide of MKV conversion for Gear VR on Windows 10/8,1/8/7/XP, mac workflow is as the same. 

Free Download Dimo Video Converter Ultimate (Win/Mac):


Other Download: 
Steps to Convert MKV with AC3 to Gear VR supported format

1. Load MKV videos

This application allows you to import your MKV files in two different ways. You can either click "Add file"  button to browse your local directory or you can simply choose to drag-and-drop your local MKV videos onto the program. Then, you can see these files will appearing on the left item tray as thumbnails.


2. Choose the optimized format for Gear VR

Open the "Select Format" drop-down format list and select SamsungGear from Device > VR  as the output format. The default setting will work great for your Gear VR.

Tips: Click the "Settings" button and customize proper video/audio parameters if necessary. Video size, bitrate and fame rate are flexible and can be adjusted as you like. According to Oculus Support Center, we recommend using 1280x720 HD resolution to encode your videos. Higher resolutions will not provide any better quality, meaning you'll waste space and processing power. We also recommend using a higher bit rate than a typical web stream at that resolution, as the pixels in your video will be magnified on the phone's screen. 

The optimal bit rate is content dependent, and many videos can get by with less, but 5 Mb/s should give good quality. (Note: While H.264 is the recommended video coding, H.265 videos can also be played, Dimo Video Converter Ultimate can also encode any video to H.265 videos for watching)


3. Add 3D Side-by-side effect

Before start the MKV conversion for Gear VR, you can click Edit, turn to 3D tab and choose "Left-right" or "Top-Bottom" to create 3D SBS/TB video files. Or crop the source video so as to get the part you want, trim the ads part off, add watermark, adjust special effect, etc..


4. Convert MKV to a Gear VR supported format 

Click "Start" on the main window. This Video Converter is highly efficient and it will finish the MKV to Gear VR conversion in minutes. After the conversion, you can transfer all the converted MKV files to watch on Gear VR.

How to view 3D video files on your Gear VR via Galaxy Note 4/5 or Galaxy S7/S6?

To view your SBS 3D video files on your Gear VR, there is an additional steps:

1. On your MicroSD card file directory, navigate to Oculus > Movies > Your Movies

2. Create a new folder within "Your Movies" and label it "3D"

3. Import or move your side-by-side 3D videos into your newly created "3D" folder

Once you have created your 3D content folder and imported compatible video files, insert your MicroSD card into your Galaxy Note 4 (if it isn't already), dock the phone in your Gear VR, and don the virtual reality headset. Then:

1. Navigate to Oculus Cinema from the main menu
2. Navigate to "My Videos" from the Oculus Cinema content library menu
3. Select the 3D video you wish to view (if you followed the above steps it should have a "3D" label in the upper righthand corner)
4. Choose the cinema mode to begin playback

Now importing your own 3D content for viewing on Samsung Gear VR through your Galaxy Note 4 or Galaxy Note 5, Galaxy S6/S6 Edge/S6 Edge+. We'll be sharing more of these helpful tips and tricks in the coming days.

Solution 3: Root your phone and add codecs for AC3 (Not commonly used)

Following is the guide: 

1. Put the file media_codecs.xml in the folder system/etc
2. Put the files libsac3d.so & libsomxac3d.so in the folder system/lib
3. Set permissions to all 3 files: 0644 (owner: root/root)
4. Reboot

Above are three solutions for Gear VR playing MKV movie with AC3 audio. Select one of them and solve this "MKV no sound in Gear VR" issue. Of course, you can also try other VR players for Gear VR to enable MKV with AC3 playable in Gear VR, but remember to choose one that support MKV with AC3 or other 7.1 audio channels to avoid continuous issues.

Free Download or Purchase Dimo Video Converter Ultimate:


Need the lifetime version to work on 2-4 PCs so that your friends and family can instantly broaden their entertainment options? Please refer to the family license here


Kindly Note:

The price of Dimo Video Converter Ultimate for Windows is divided into 1 Year Subscription, Lifetime/Family/Business License: $43.95/Year; $45.95/lifetime license; $95.95/family license(2-4 PCs); $189.95/business pack(5-8 PCs). Get your needed one at purchase page.

Related Software:

BDmate (Win/Mac)

Lossless backup Blu-ray to MKV with all audio and subtitle tracks; Rip Blu-ray to multi-track MP4; ConvertBlu-ray to almost all popular video/audio formats and devices; Copy Blu-ray to ISO/M2TS; Share digitized Blu-ray wirelessly.

DVDmate (Win/Mac)

A professional DVD ripping and editing tool with strong ability to remove DVD protection, transcode DVD to any video and audio format, and edit DVD to create personal movie.

Videomate (Win/Mac)

An all-around video converter software program that enables you to convert various video and audio files to formats that are supported by most multimedia devices.

8K Player (Win/Mac)

A mixture of free HD/4K video player, music player, Blu-ray/DVD player, video recorder and gif maker. 


Contact us or leave a message at Facebook if you have any issues.

Related Articles: